How to Post a Job/Internship
To post Jobs and Internships on Handshake, please see the instructions below. For a more detailed look on Handshake, download the Employer Handshake Guide.
- On home dashboard, click Post a Job or click on Jobs in the left-hand navigation bar.

- There are four required pages of the job posting form: Basics, Details, Preferences, and Schools. You can use the toolbar at the bottom to navigate between pages on the job post form. While these pages contain both required and optional fields, we highly recommend completing all fields.
- Helpful Tip: the more fields you complete, the more well defined your job posting will be (and the more likely you’ll be to attract well-qualified candidates and approvals from schools).
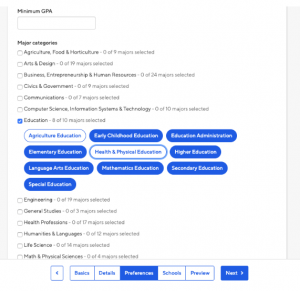
- If you do not have any preferences in the categories in the Preferences tab, you can leave all the options blank.
- If you are new to creating an internship, utilize the Internship Tool Kit to help you get started.
3. For the Schools section, add schools using the drop-down arrow.
- Note: if your company has not been approved to post jobs at a school, you will not see that school as an option. If you have not been approved at any schools, you can still create this job and come back later to add schools.
- When adding schools you will see ways to manage them:
- Interview on campus? – selecting this will simply flag this job on the school side, as an employer potentially interested in interviewing. To actually request an on-campus interview, please see the Employer Handshake Guide.
-
- Apply start date – you can choose if you’d like to block students from applying to your job until a specific date.
- Expiration date – you can update the date that the job will expire at that school (and students will no longer be able to apply).
- Adding a Global apply start date allows you to update the job start date for every school on your list (it will overwrite previously set start dates).
- Adding a Global post expiration allows you to update the post expiration for every school on your list (it will overwrite previously set expiration dates).

4. Select Next to continue to the Preview section.
If you’re happy with how it looks, click Save in the lower right corner to save the job and send your posting out to schools to be reviewed.
Tip: To see the history of your company’s Handshake profile, learn how to schedule interviews and more, click to see the Employer Handshake Guide.